What to Use to Fill Gaps Between Bricks
To fill gaps between bricks, it is recommended to use mortar.
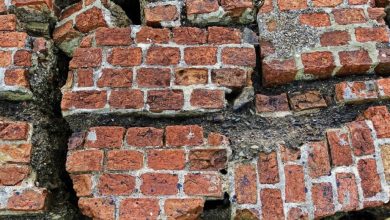
Mortar repair, also known as repointing, is the process of filling in gaps between bricks with a cement-based mortar or a lime putty and sand mortar.
To do this, you will need tools such as a hammer and cold chisel, utility chisel, stiff-bristled brush, water hose, and a tuck-pointing trowel.
The process involves mixing and applying the mortar to the gaps, ensuring the consistency is correct, packing the mortar tightly, removing excess mortar, and cleaning the brick face.
It is also important to mist the new mortar twice a day for two days and protect it from weather with a tarp.
While polymeric sand and concrete and sand mixtures are options, using mortar is generally recommended.
For brick supplies, Batchelder & Collins can provide the necessary materials.
Did You Know?
1. Did you know that in ancient times, a mixture of animal hair and straw called “daub” was commonly used to fill gaps between bricks in buildings? It served as a natural insulation material and helped reinforce the structure.
2. Before modern construction methods, a paste made from crushed seashells and lime was used to fill gaps between bricks. This mixture, known as “sea shell lime mortar,” was not only effective in filling gaps but also provided added strength to the structure.
3. In some regions, particularly in rural areas, a combination of manure and clay was used as a gap-filling material between bricks. This concoction, called “cow dung clay,” not only filled the gaps but also acted as a natural insect repellent due to its strong odor.
4. In early civilizations, such as ancient Egypt, builders would sometimes use a mixture of mud and straw to fill gaps between bricks. This technique, known as “mud and straw infill,” provided additional support to the structure and helped regulate temperature and humidity inside the buildings.
5. In certain parts of the world, including parts of India and the Middle East, builders used a mixture called “jaggery lime mortar” to fill gaps between bricks. This unique combination involved mixing jaggery, a type of unrefined sugar, with lime to create a durable and resilient filling material.
Repointing: How To Fill Gaps Between Bricks
Repointing is the process of filling gaps between bricks with fresh mortar, which helps strengthen and stabilize the structure. This technique is essential in maintaining the integrity and aesthetics of brickwork. When it comes to choosing the right material for repointing, there are two primary options:
1. Cement-based mortar: This is a popular choice due to its strength and durability. It is made by mixing cement, sand, and water, creating a rigid and sturdy compound. Cement-based mortar is ideal for areas with high moisture exposure and for structural repairs where strength is crucial. However, it may not be the best choice for historic or older buildings as it can be too rigid and may not provide the necessary flexibility.
2. Lime putty and sand mortar: This is a more traditional and flexible option. It consists of lime putty, derived from heated limestone, and sand. This mixture creates a mortar that is more forgiving and allows for movement and natural expansion and contraction of the bricks. Lime mortar is commonly used for repointing historic buildings or those with softer or more delicate bricks.
To summarize:
- Cement-based mortar: strong and durable, suitable for areas with high moisture exposure and where strength is crucial.
- Lime putty and sand mortar: traditional and flexible, ideal for historic buildings or those with softer bricks.
“Repointing is the process of filling gaps between bricks with fresh mortar, which helps strengthen and stabilize the structure.”
– Cement-based mortar: strong and durable, suitable for areas with high moisture exposure and where strength is crucial.
– Lime putty and sand mortar: traditional and flexible, ideal for historic buildings or those with softer bricks.
Mortar Repair Essentials: Cement-Based Mortar Vs. Lime Putty And Sand Mortar
When deciding which type of mortar to use for your repointing project, it is crucial to consider the specific needs of your brickwork. Cement-based mortar provides excellent strength and durability, making it suitable for areas with high wear and tear or exposure to moisture. In contrast, lime putty and sand mortar offer flexibility, making it a preferred choice for older or historic buildings.
When using cement-based mortar, it is important to follow the manufacturer’s instructions for mixing and application. The consistency of the mortar mix is crucial; it should be workable but not too runny. Resting and stirring the mortar before use helps to ensure an even distribution of materials. Loading the mortar onto a brick trowel and packing it tightly into the gaps between bricks is essential for proper adhesion.
In the case of lime putty and sand mortar, the mixing process is slightly different. It is ideal to mix the lime putty with water and let it sit for a day or two to mature. Afterward, the sand is added gradually until the desired consistency is achieved. This mortar mix is typically softer and more pliable than cement-based mortar, requiring gentle application and packing.
Removing Old Mortar: Tools And Techniques
Before repointing, it is crucial to remove any old and deteriorated mortar. This process ensures a strong bond between the bricks and the new mortar. Several tools and techniques can be used to remove old mortar effectively.
-
Hammer and cold chisel – commonly used to chip away at the old mortar for its removal. By carefully positioning the chisel on the mortar joint and striking it with a hammer, the old mortar can be broken away. Caution is required to prevent damage to the bricks.
-
Utility chisel – another useful tool for removing old mortar, especially for larger or deeper joints. Its wider working edge makes it suitable. Similar care must be taken to avoid damaging the bricks. The chisel should be guided along the mortar joint to gradually remove the old mortar.
After removing the old mortar, it is essential to clean the joints thoroughly. A stiff-bristled brush and water hose can be used to remove any remaining debris. The brush helps scrub away loose particles, while the water hose washes away the residue.
-
Stiff-bristled brush – useful for scrubbing away loose particles.
-
Water hose – helps wash away the remaining residue.
Tip: It is important to exercise caution and follow proper techniques when removing old mortar to avoid damaging the bricks.
Step-By-Step Instructions For Mixing And Applying Mortar
Once the old mortar has been removed and the joints are clean, the next step is to mix and apply the new mortar. Whether you are using cement-based mortar or lime putty and sand mortar, careful mixing and application are essential for a successful repointing job.
When using cement-based mortar, follow the manufacturer’s instructions for mixing ratios. It is important to achieve the right consistency – workable but not too runny. Allow the mortar to rest and stir occasionally to ensure even distribution of materials.
- Load the mortar onto a brick trowel, ensuring it is evenly spread.
- Pack the mortar tightly into the gaps between the bricks, ensuring full penetration and bonding.
For lime putty and sand mortar, mix the lime putty with water and let it mature for a day or two. Gradually add the sand until the desired consistency is achieved.
- Apply the mortar carefully, ensuring it is gently pressed into the joints without disturbing the bricks.
- Avoid excessive force that could displace the bricks or damage the mortar.
Post-Application Care: Protecting And Maintaining New Mortar
After repointing, it is crucial to take proper care of the new mortar to ensure its longevity and durability. This includes protecting it from the elements and maintaining its hydration.
Mist the new mortar twice a day for the first two days after application. This helps keep the mortar damp, allowing it to cure slowly and properly. Additionally, cover the repointed areas with a tarp or plastic sheeting to protect it from direct sunlight, rain, or extreme temperature changes. This protective covering should remain in place for at least a week.
Regular maintenance is also key to extending the life of the repointed mortar. Remove any debris or vegetation that may accumulate on the mortar joints. Use a soft-bristled brush to gently clean the face of the bricks, avoiding harsh abrasives or chemicals that could damage the mortar or brickwork.
In conclusion, repointing is a crucial aspect of maintaining the structural integrity and aesthetic appeal of brickwork. Choosing the right mortar, whether it be cement-based or lime putty and sand, is essential for a successful and durable result. Carefully removing old mortar using tools such as hammer and cold chisels or utility chisels is necessary to create a clean surface for the new mortar. Proper mixing and application, as well as post-application care, are all vital steps in achieving efficient and durable repointed brickwork. By following these expert recommendations, you can ensure your repointing project is a success.
Check this out:
Frequently Asked Questions
What do you use in between bricks?
In order to ensure the stability and strength of structures, mortar is used to fill and seal the gaps between bricks. This workable paste hardens over time, effectively binding the building blocks together. By spreading the weight evenly and filling irregular gaps, mortar plays a crucial role in maintaining the integrity of masonry walls. Additionally, mortar can also be utilized to add decorative elements by incorporating different colors or patterns, enhancing the aesthetic appeal of the structure.
Can you use cement between bricks?
Yes, cement can be used between bricks, but the type of mortar required depends on the age of the brick structure. For bricks aged 50 years or younger, standard cement-based mortar is suitable for repairs. However, if the structure was built before World War II, the original mortar is likely a special mix of lime putty and sand made specifically for historic brick structures. In this case, it is important to match the original mortar to maintain the authenticity and integrity of the brickwork.
What are the gaps between bricks called?
The gaps between bricks in external walls are commonly known as weepholes. Weepholes serve an important function as they allow for the drainage of water that may accumulate behind the brickwork. These gaps help prevent moisture buildup and potential damage to the walls, ensuring the structural integrity of the building. By creating a pathway for water to escape, weepholes play a crucial role in maintaining the durability and longevity of brick walls. Additionally, they also aid in ventilating the space between the bricks, further preventing the growth of mold or mildew.
Can you put sand in between bricks?
Yes, sand can indeed be placed in between bricks for various reasons. The use of sand in brick paver joints serves several important functions. Firstly, it helps to stabilize the joints, ensuring that the bricks remain in place and do not shift or move over time. Additionally, the sand aids in keeping the pavers level, preventing any unevenness or sloping. Lastly, by filling the void between the bricks, the sand helps to secure them, preventing them from becoming loose or wobbly. Overall, sand plays a crucial role in maintaining the stability and longevity of brick paver installations.