How to Throw Pottery Without a Wheel
Throwing pottery without a wheel can be achieved through various hand-building techniques such as coil pots, pinch pots, molds, and slab building.
These techniques are adaptable for all skill levels and ages.
Attention to detail is important to achieve a finished product, and creativity allows for experimentation with different styles.
For example, to make a coil pot without a wheel, one can use the score and slip method to attach coils to the base of the pot.
Handles can be made by rolling coils and attaching them securely.
Drying the pottery slowly is crucial to prevent cracking.
Applying glaze and firing the pottery in a kiln completes the process.
Other methods include pinch pots, molds, and slab pots.
Ultimately, there are many alternatives for throwing pottery without a wheel, and each technique offers its own approach and opportunities for creativity.
Check this out:
Did You Know?
1. Pottery has been made without the use of a wheel for thousands of years, utilizing techniques such as coil-building, pinching, and slab construction. This style of pottery is known as hand-building and is still practiced today.
2. One ancient hand-building technique used to throw pottery without a wheel is called the “coiling method.” It involves creating long, snake-like coils of clay and stacking them on top of each other to form the shape of the vessel.
3. In Japan, there is a unique hand-building method called “Raku” that involves rapidly firing the pottery in a kiln and then abruptly cooling it in water or sand. This technique creates distinctive and unpredictable glaze patterns.
4. Indigenous cultures in the Americas, such as the Native Americans, utilized hand-building techniques to create intricate and functional pottery. These ceramics were often decorated with distinctive patterns and symbols that represented their cultural heritage.
5. The Egyptian civilization, known for their remarkable pottery, used hand-building techniques extensively. They were particularly skilled at creating elegant and intricate vessels using the slab construction method, which involves rolling out clay sheets and cutting and assembling them into the desired shape.
Techniques for Making Pottery Without a Wheel
Pottery is a beautiful art form that has been practiced for centuries. While many people associate pottery with throwing on a wheel, there are actually several techniques for making pottery without a wheel.
These techniques include hand-building techniques such as coil pots, pinch pots, molds, and slab building. Each technique offers a unique approach to creating pottery and allows for creativity and experimentation.
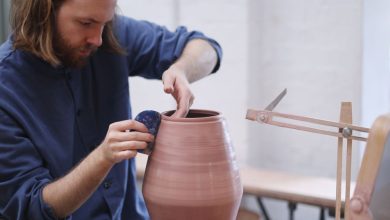
Coil pots are made by rolling out long coils of clay and stacking them on top of each other. The coils are then joined together by using a score and slip method, which involves scratching the surface of the clay and applying a layer of moist clay to create a strong bond. This technique allows for the creation of vessels of various sizes and shapes, from small cups to large vases. The process of making a coil pot without a wheel involves patience and attention to detail, as each coil needs to be carefully secured and aligned.
Pinch pots, on the other hand, are made by starting with a small ball of clay and pinching the clay between the thumb and forefinger. This technique allows for the creation of small bowls or cups with a distinct organic shape. Pinch pots can be further shaped and adjusted by gently pressing and smoothing the clay with the fingers or using a rubber rib. The versatility of pinch pots makes them a great option for beginners and children.
Molds are another technique for making pottery without a wheel. One popular type of mold is a hump mold, which is a convex mold used to create dishes or bowls with a gentle curve. To use a hump mold, a slab of clay is placed over the mold and shaped by pressing it gently onto the curved surface. The final shape of the pottery can be adjusted by trimming excess clay and adding a foot ring or feet during finishing. Using molds allows for consistent shape and size, making it a great option for making multiples of the same design.
Slab building involves rolling out flat sheets of clay and cutting them into templates to construct various forms. These templates are then joined together by scoring and slipping the edges and can be shaped into boxes, vases, or even sculptural forms. Slab building offers a great opportunity for creativity as designs can be incised, decorated, or even combined with other techniques such as coil or pinch pots. The use of wooden battens or roller guides ensures even thickness when rolling out slabs, and smoothing tools can be used to refine the final shape.
Hand-Building Techniques: Coil Pots, Pinch Pots, Molds, and Slab Building
Hand-building techniques provide a versatile and accessible way to create pottery without the need for a wheel. The four primary hand-building techniques include:
-
Coil pots: Created by rolling out long coils of clay and stacking them to build up the form of the pot. Coils are joined together using a score and slip method, where the surface of the clay is scored and moist clay is applied to create a strong bond. Coils can be added to create height or width, allowing for the creation of various vessel shapes and sizes. The finished pot can be smoothed and refined using fingers, sponges, or modeling tools.
-
Pinch pots: Made simply by pinching the clay between the thumb and forefinger. The clay is gradually shaped and molded by applying pressure and smoothing the surface with the fingers or a rubber rib. Pinch pots can be small and delicate or larger and more robust, depending on the amount of clay used and the desired final shape. Pinch pots offer a more organic and freeform aesthetic and can be easily adapted to create different styles.
-
Molds: A useful tool in hand-building pottery as they allow for consistent shapes and sizes. Hump molds, which have a convex shape, can be used to create dishes or bowls with a gentle curve. The clay is rolled out into a slab and carefully pressed onto the mold to create the desired shape. Molds with a little flex are ideal as they allow for easy removal of the clay. Molds can also be used to create more complex forms by using a combination of coils, slabs, or pinching techniques.
-
Slab building: Involves rolling out flat sheets of clay and cutting them into templates to construct various forms. These templates are then joined together using a score and slip method or by adding additional clay coils. The finished form can be adjusted by smoothing the surface, incising designs, or adding decorative elements. Slab building allows for the creation of boxes, plates, vases, or even sculptural shapes. By combining slab building with other hand-building techniques, such as coil pots or pinch pots, unique and intricate pieces can be created.
-
Bullets added at the end:
- Coil pots are created by rolling out long coils of clay and stacking them to build up the form of the pot.
- Pinch pots are made simply by pinching the clay between the thumb and forefinger.
- Molds allow for consistent shapes and sizes in hand-building pottery.
- Slab building involves rolling out flat sheets of clay and cutting them into templates to construct various forms.
Adaptability of Hand-Building Techniques for All Skill Levels and Ages
One of the great advantages of hand-building techniques for pottery is their adaptability for all skill levels and ages. Whether you are a beginner starting out or an experienced artist looking to explore new possibilities, these techniques offer a range of options that can be tailored to suit individual needs.
Coil pots are a great technique for beginners as they involve simple, repetitive actions such as rolling coils and stacking them. This technique allows beginners to focus on basic clay handling skills and understanding the structural integrity of a pot. With practice, individuals can graduate to more complex coil pot designs, experimenting with different shapes and sizes.
Pinch pots are another technique that is accessible to beginners. The simple act of pinching the clay allows for a hands-on approach and encourages experimentation. Pinch pots can be made in various sizes and shapes, making them suitable for all levels of experience. Beginners can start with small pinch pots to develop their skills and gradually progress to larger and more elaborate designs.
Molds offer a consistent shape and size, which can be beneficial for beginners who are just starting to explore hand-building techniques. Using molds allows individuals to focus on refining their clay handling skills without having to worry about the structural integrity of the form. Molds can be used as a stepping stone to more advanced techniques or can be a preferred method for those who enjoy the precision and consistency that molds provide.
Slab building offers a wide range of possibilities for all skill levels. Beginners can start by rolling out simple slabs and experimenting with joining techniques, while more advanced artists can push the boundaries of slab building by incorporating other hand-building techniques and creating intricate designs.
Hand-building techniques are not limited by age either. They can be enjoyed by children and adults alike. The simplicity of pinch pots and the tactile nature of clay make it an engaging activity for children, sparking their creativity and developing their fine motor skills. Older adults can also find joy in hand-building pottery, as it offers a meditative and soothing experience that allows for self-expression and exploration.
4. Importance of Attention to Detail for Achieving a Finished Product
When it comes to hand-building pottery without a wheel, attention to detail is crucial for achieving a structurally sound and visually pleasing finished product. While hand-building techniques offer flexibility and room for creativity, it is important not to overlook the finer details that can make a significant difference in the final result.
Regardless of the hand-building technique being used, joining and smoothing of the clay is essential. Whether working with coils, slabs, or pinched clay, securely attaching the pieces and ensuring they are free of cracks is vital for the overall stability of the pottery. Utilizing the score and slip method, where the surface of the clay is scored and moist clay is applied, helps create a strong bond between the clay pieces.
Smoothing the surface of the pottery is another crucial detail. Small cracks or imperfections can be smoothed out using tools such as fingers, sponges, or a rubber rib. Taking the time to refine the surface not only enhances its visual appeal but also contributes to the overall durability of the piece.
In addition to joining and smoothing, paying attention to the details of the pot’s shape and size is important. Ensuring that each coil is aligned, each pinch is deliberate, or each slab is cut accurately can greatly impact the final outcome. Attention to detail also allows for the creation of intricate designs or decorative elements that elevate the pottery to a higher level of artistry.
Finally, when it comes to finishing the pottery, choosing the appropriate firing methods and glazes requires attention to detail. Different types of clay have their own firing temperature ranges, and selecting the appropriate range is crucial to prevent cracking or breakage during the firing process. Similarly, selecting the right type of glaze and applying it carefully can significantly enhance the visual appeal of the finished piece. Attention to detail in the finishing stages ensures that the time and effort put into creating the pottery are rewarded with a beautiful and durable final product.
5. Creativity and Experimenting with Different Styles
One of the joys of throwing pottery without a wheel is the freedom to experiment with different styles and unleash one’s creativity. Hand-building techniques such as coil pots, pinch pots, molds, and slab building offer endless possibilities for expression and personal style.
Creativity can be expressed through the choice of clay, color, shape, and texture. Hand-building techniques allow for the exploration of various forms and designs that may not be achievable on a traditional wheel. By using coils, pinching clay, or working with molds, artists can create unique vessels with organic shapes, asymmetrical forms, or intricate textures.
Experimenting with different styles is encouraged as it allows individuals to discover their own artistic voice. Each hand-building technique offers its own aesthetic and can be adapted to suit personal preferences. For example, coil pots can be created with loose coils for a more rustic appearance or tightly stacked coils for a more structured and geometric design. Pinch pots can be shaped into tall and slender vessels or squat and rounded forms, depending on the desired style.
Incorporating elements from multiple techniques or combining hand-building with other forms of pottery, such as sculpture or wheel throwing, also allows for the creation of unique pieces that reflect one’s individual artistic vision. This experimentation with different styles not only helps develop technical skills but also fosters an exploration of personal expression and the development of a signature artistic style.
Creativity and experimentation go hand in hand in the world of hand-built pottery. Embracing the freedom to try new techniques, materials, and designs enables artists to push boundaries, innovate, and create truly one-of-a-kind pieces. Whether it’s exploring bold colors, playing with textures, or challenging traditional forms, the possibilities are endless when it comes to hand-building pottery without a wheel.
6. Step-By-Step Instructions for Making a Coil Pot Without a Wheel
Making a coil pot without a wheel is a rewarding process that allows for creativity and a hands-on approach to pottery making. With attention to detail and a few simple steps, you can create a beautiful and unique coil pot. Here is a step-by-step guide to making a coil pot without a wheel:
- Gather your materials:
- Clay
- Rolling pin or slab roller
- Knife or clay cutting tool
- Scoring tool (such as a fork or a serrated rib)
- Slip (a mixture of clay and water)
- Sponge
-
Any additional tools or decorations you wish to use
-
Prepare your workspace:
- Clear a clean surface for working with clay
-
Place some canvas or a clean cloth on the surface to prevent the clay from sticking
-
Prepare your clay:
- Begin by wedging or kneading your clay to remove any air bubbles and ensure an even consistency
-
Divide the clay into smaller sections for creating coils
-
Roll out your coils:
- Take a section of clay and roll it into a long coil by applying even pressure with your palms on the clean surface
-
Rotate the clay as you roll to maintain an even thickness
-
Assemble the base:
- Take one end of a coil and form it into a small circle or disk for the base of your pot
-
Smooth the surface using a sponge or your fingers to ensure a secure attachment
-
Add coils:
- Apply a thin layer of slip to the top edge of the base
- Attach another coil by pressing it gently into the slip
- Secure the coil using a score and slip method (scratching the surface of the clay and applying slip)
-
Repeat this process to add more coils as you build up the pot
-
Secure each coil:
- Make sure to securely attach each new coil to the one below
- Apply slip and score the surfaces before pressing them together to ensure a strong bond
-
Smooth the surface using a sponge or a rubber rib to blend the coils together
-
Vary the width and design:
- Vary the width of the coils to create a unique shape or add design details
-
Use your fingers or tools to shape and refine the pot to your desired form
-
Make a handle:
- If desired, create a handle for your pot by rolling out a coil and attaching it securely to the pot using the score and slip method
-
Smooth the surface and shape the handle to create a comfortable grip
-
Dry the pottery slowly:
- Once you have finished constructing your coil pot, allow it to dry slowly to prevent cracking
- Place it on a clean surface away from direct sunlight or drafts
- Cover it loosely with plastic to slow down the drying process and ensure even drying
-
Apply glaze and fire:
- Once the pot is completely dry, it is ready for the final steps
- Apply glaze to the surface of the pottery according to the manufacturer’s instructions
- Fire it in a kiln to the recommended temperature following the heat chart and firing guidelines to achieve the desired result
By following these step-by-step instructions, you can create a coil pot without a traditional wheel. Remember to have fun, be patient, and embrace the creative possibilities that hand-building techniques offer.
Frequently Asked Questions
What can I use instead of a pottery wheel?
Instead of a pottery wheel, a viable alternative could be using a turntable or Lazy Susan. By placing your clay on the turntable and manually rotating it, you can still achieve a similar effect to using a pottery wheel. While it may require more effort, it is a cost-effective solution that can be easily found in many households or purchased at an affordable price.
Alternatively, you can explore using hand-building techniques such as coil or slab pottery. These methods involve shaping the clay by hand instead of using a wheel. With a little practice and creativity, you can create unique and one-of-a-kind pottery pieces without the need for a pottery wheel. This approach allows for more freedom and experimentation, resulting in truly personalized and handcrafted pottery.
Do I need a pottery wheel to make pottery?
No, you do not need a pottery wheel to make pottery. While a pottery wheel can be useful for creating consistent shapes and adding intricate details, it is not a requirement for making pottery. With just a lump of clay and your creativity, you can explore hand-building techniques such as pinching, coiling, or slab building to create unique and beautiful pottery pieces. These methods allow for freedom and individuality in the creative process and can be equally fulfilling. So, don’t let the absence of a pottery wheel stop you from diving into the wonderful world of pottery!
Can you throw pottery without a kiln?
While a kitchen oven can be used to fire ceramics without a kiln, it has limitations. The temperature range of a typical kitchen oven can reach around 500-550 degrees Fahrenheit, which is considerably lower than the temperatures required for proper ceramic firing. Additionally, the lack of proper ventilation and control over the firing process may result in inconsistent and unpredictable results. However, for small-scale and experimental projects, utilizing a kitchen oven can be a creative and convenient option.
1. What alternative techniques can be used to throw pottery without using a wheel?
There are several alternative techniques that can be used to throw pottery without a wheel. One such technique is hand-building, where the potter uses their hands and basic tools to shape the clay. This can involve pinching, coiling, and slab building methods. Pinching involves shaping the clay by using the fingers and thumbs to pinch and form it into the desired shape. Coiling involves creating long coils of clay and layering them on top of each other to build up the walls of the pottery piece. Slab building involves rolling out flat pieces of clay and then cutting and shaping them into the desired form.
Another technique is mold casting, where a mold is used to shape the clay. This can involve using pre-made plaster or silicone molds, or even making custom molds from objects or forms. The clay is pressed or poured into the mold and then removed once it has dried or hardened. This technique allows for replicating specific shapes and designs with precision.
These alternative techniques provide opportunities for creativity and versatility in pottery-making, allowing artists to explore different forms and textures without relying on a traditional pottery wheel.