How to Patch Plaster
To patch plaster, follow these six steps:
1.
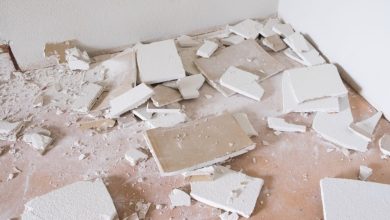
Prep the area: Start by cleaning the damaged area with a brush or vacuum to remove loose debris.
Use a utility knife to shape the hole into a square or rectangle, creating straight edges.
2.
Apply a bonding agent: Wet the hole with a sponge, then apply a bonding agent like a plaster bonder or primer to help the new plaster adhere to the old surface.
3.
Mix the plaster: Follow the manufacturer’s instructions to mix the plaster compound until it reaches a creamy consistency.
Avoid mixing too much at once to prevent wastage.
4.
Apply the plaster: Using a putty knife or trowel, apply a thin layer of plaster to fill the hole.
Smooth it out and feather the edges to blend it with the surrounding wall.
Allow it to dry as per the manufacturer’s instructions.
5.
Sand and repeat: Once the plaster is dry, use sandpaper to smooth any lumps or uneven areas.
Apply another thin layer of plaster, slightly wider than the previous one, feathering the edges again.
Repeat this step until the hole is completely filled and level with the wall.
6.
Finish and paint: After the final layer of plaster is dry and sanded smooth, prime and paint the patched area to match the surrounding wall.
Ensure the paint is applied evenly and blends seamlessly.
Remember to be patient during the drying process and allow enough time between layers for proper curing.
With a bit of practice, patching plaster can be a straightforward home repair project for beginners.
Check this out:
Did You Know?
1. Plaster is one of the oldest building materials used by humans, dating back over 9,000 years to ancient civilizations in Mesopotamia.
2. Did you know that before the invention of drywall, plaster was the go-to material for interior walls? It was widely used up until the 1950s.
3. The term “plaster” comes from the Greek word “plastron,” meaning “to daub or smear.” This refers to the application method of spreading plaster on walls or surfaces.
4. Interestingly, adding horsehair to plaster was a common practice to increase its strength and durability. The hair acted as a reinforcement, preventing the plaster from cracking or crumbling.
5. You might be surprised to learn that plaster is not just used for walls. It has been historically used for creating decorative sculptures, molds, and even for making intricate ceiling designs called “plasterwork” or “stucco.”
Understanding The Differences: Plaster Vs. Drywall
When it comes to repairing interior walls, it is important to understand the differences between plaster and drywall. Plaster walls have been a popular choice for decades, known for their durability and aesthetic appeal. However, fixing plaster is a unique process compared to repairing drywall.
Plaster walls are typically heavier, as they are constructed with wooden lath underneath the plaster surface. This makes them more prone to structural anomalies such as horizontal studs. On the other hand, drywall is made from gypsum pressed between paper layers, making it lighter and easier to work with.
Understanding the differences between plaster and drywall is crucial, as it determines the approach and materials needed to successfully patch your interior walls.
Prioritizing Safety And Preparation
Before embarking on your plaster patching journey, it is crucial to prioritize safety and proper preparation. Protecting both your home and yourself from potential harm should be your primary concern.
To ensure safety during the repair process, follow these steps:
-
Lay down a drop cloth: Place a drop cloth underneath the area you’ll be working on to catch any falling debris. This will help keep your surroundings clean and prevent damage to furniture or flooring.
-
Secure the drop cloth: Use painter’s tape to secure the drop cloth in place. This will prevent it from shifting or causing accidents as you work.
-
Wear goggles and a mask: Plaster repairs can create dust and airborne particles that may be harmful when inhaled. To protect your eyes and lungs, wear goggles and a mask specifically designed for this purpose.
By taking these necessary safety measures, you can now proceed with repairing your plaster walls.
- Lay down a drop cloth to catch falling debris
- Secure the drop cloth with painter’s tape
- Wear goggles and a mask to protect against plaster dust and airborne particles.
Remember, safety should always come first when working on any home improvement project.
“Safety first, plaster patching second.”
Patience Is Key: Dealing With Drying Times
When it comes to patching plaster, patience is key. Unlike other home repairs that may be completed quickly, patching plaster walls requires longer drying times.
Plaster needs ample time to dry and cure properly to ensure a seamless finish. Rushing the process may result in cracks or an uneven surface. Depending on the size and depth of the repair, it may take up to several days for the plaster to fully dry.
During this waiting period, it is crucial to resist the temptation to sand or paint the repaired area too soon. Allow the plaster to completely dry to ensure a long-lasting and professional-looking result.
- Patience is crucial when patching plaster walls.
- Plaster needs ample time to dry and cure properly.
- Rushing the process may result in cracks or an uneven surface.
- Depending on the size and depth of the repair, it may take up to several days for the plaster to fully dry.
- Resist the temptation to sand or paint the repaired area too soon.
- Allow the plaster to completely dry for a long-lasting and professional-looking result.
“When it comes to patching plaster, patience is key.”
Step-By-Step Guide To Patching Plaster Walls
Now that you understand the differences between plaster and drywall and have taken the necessary safety precautions, it’s time to dive into the step-by-step process of patching your plaster walls. Here is a comprehensive guide to help you through the process:
Step 1: Prepare the damaged area by removing any loose plaster or debris using a utility knife or chisel. Ensure the edges of the hole are clean and free from any loose particles.
Step 2: Moisten the damaged area with clean water using a spray bottle. This will prevent the new plaster from drying out too quickly and improve adhesion.
Step 3: Mix the plaster according to the manufacturer’s instructions, ensuring a smooth consistency. It is advisable to start with a small batch of plaster to gauge the drying time and workability.
Step 4: Apply the plaster to the damaged area using a putty knife or trowel. Begin by filling the hole and gradually building up the layers until the patch is level with the surrounding wall surface.
Step 5: Smooth the surface of the patch using a clean putty knife or trowel. Feather the edges to blend the patch seamlessly with the surrounding plaster.
Step 6: Allow the plaster to dry completely. This step requires patience, as drying times vary depending on the size and thickness of the patch. Avoid touching or sanding the repaired area until it is fully cured.
Minimal Effort, Maximum Results
Patching plaster walls may sound intimidating, but with the right approach, it can be a minimal-effort project that yields maximum results.
While the drying times may be lengthy, the actual workload is relatively minimal. With proper safety precautions, preparation, and following the step-by-step guide, even beginners can achieve professional-looking results and restore the integrity of their interior walls.
Remember, take your time, allow the plaster to dry thoroughly, and resist the urge to rush or cut corners. Your patience and attention to detail will be rewarded with a seamlessly repaired and visually pleasing plaster wall.
- Proper safety precautions
- Thorough preparation
- Step-by-step guide
“Your patience and attention to detail will be rewarded with a seamlessly repaired and visually pleasing plaster wall.”
Conclusion: A Beginner-Friendly Home Repair Project
Patching up holes in interior plaster walls is an excellent home repair project for beginners. By understanding the differences between plaster and drywall, prioritizing safety and preparation, being patient with drying times, and following a step-by-step approach, you can successfully restore your plaster walls with minimal effort.
With this guide in hand, you are well-equipped to take on the challenge of repairing your interior plaster walls. So, embrace the opportunity, exercise caution, and enjoy the satisfaction of a job well done.
- Understand the differences between plaster and drywall
- Prioritize safety and preparation
- Be patient with drying times
- Follow a step-by-step approach
“Patching up holes in interior plaster walls is an excellent home repair project for beginners.”
Embrace the opportunity, exercise caution, and enjoy the satisfaction of a job well done.
Frequently Asked Questions
What should I use to patch plaster?
When it comes to patching plaster, the ideal choice would be to use a combination of self-adhesive fiberglass wallboard tape and joint compound. For small cracks, a small amount of spackle can easily restore their appearance and integrity. However, when dealing with larger holes, it is important to provide extra reinforcement. By placing a strip of self-adhesive fiberglass wallboard tape over the hole, you can create a strong foundation. Then, using a putty knife, carefully cover the tape with a smooth and even layer of joint compound, ensuring a seamless finish. This method not only ensures the stability of the patch but also guarantees a visually appealing result.
Can you patch repair plaster?
Yes, patch repair of plaster is definitely possible. By using a few basic tools and materials, you can seamlessly repair damaged plaster surfaces. First, it is important to prepare the area by removing any loose plaster and cleaning it thoroughly. Once prepared, apply a coat of patching plaster to fill the damaged area, making sure to create a smooth and level surface. After allowing the patch to dry, sand it down to achieve a flush finish. With proper technique and attention to detail, your repaired plaster will blend seamlessly with the rest of the wall, providing a clean and ready surface for decoration.
Is plaster easy to patch?
While patching holes in plaster walls or ceilings may require more time and skill compared to drywall, it can still be accomplished with relative ease. The process involves carefully cleaning and preparing the damaged area, mixing plaster to the correct consistency, and applying the mixture with precision. Once the plaster is dried and sanded, it seamlessly blends with the existing surface, resulting in a smooth and restored finish. Although the task may demand a bit more effort, the rewarding outcome of a flawlessly repaired plaster surface makes it well worth the extra time and skill.
Can you patch plaster with cement?
Yes, in certain situations, it is possible to patch plaster with cement. When time is of the essence and the affected area is small, UNICRET-FAST can be employed as a fast-setting white cement-lime mortar for speedy plaster repairs. It is important to note that the temperature during application should fall within the range of +5oC to +35oC. By utilizing this alternative, efficient and effective repairs can be accomplished without compromising quality.